
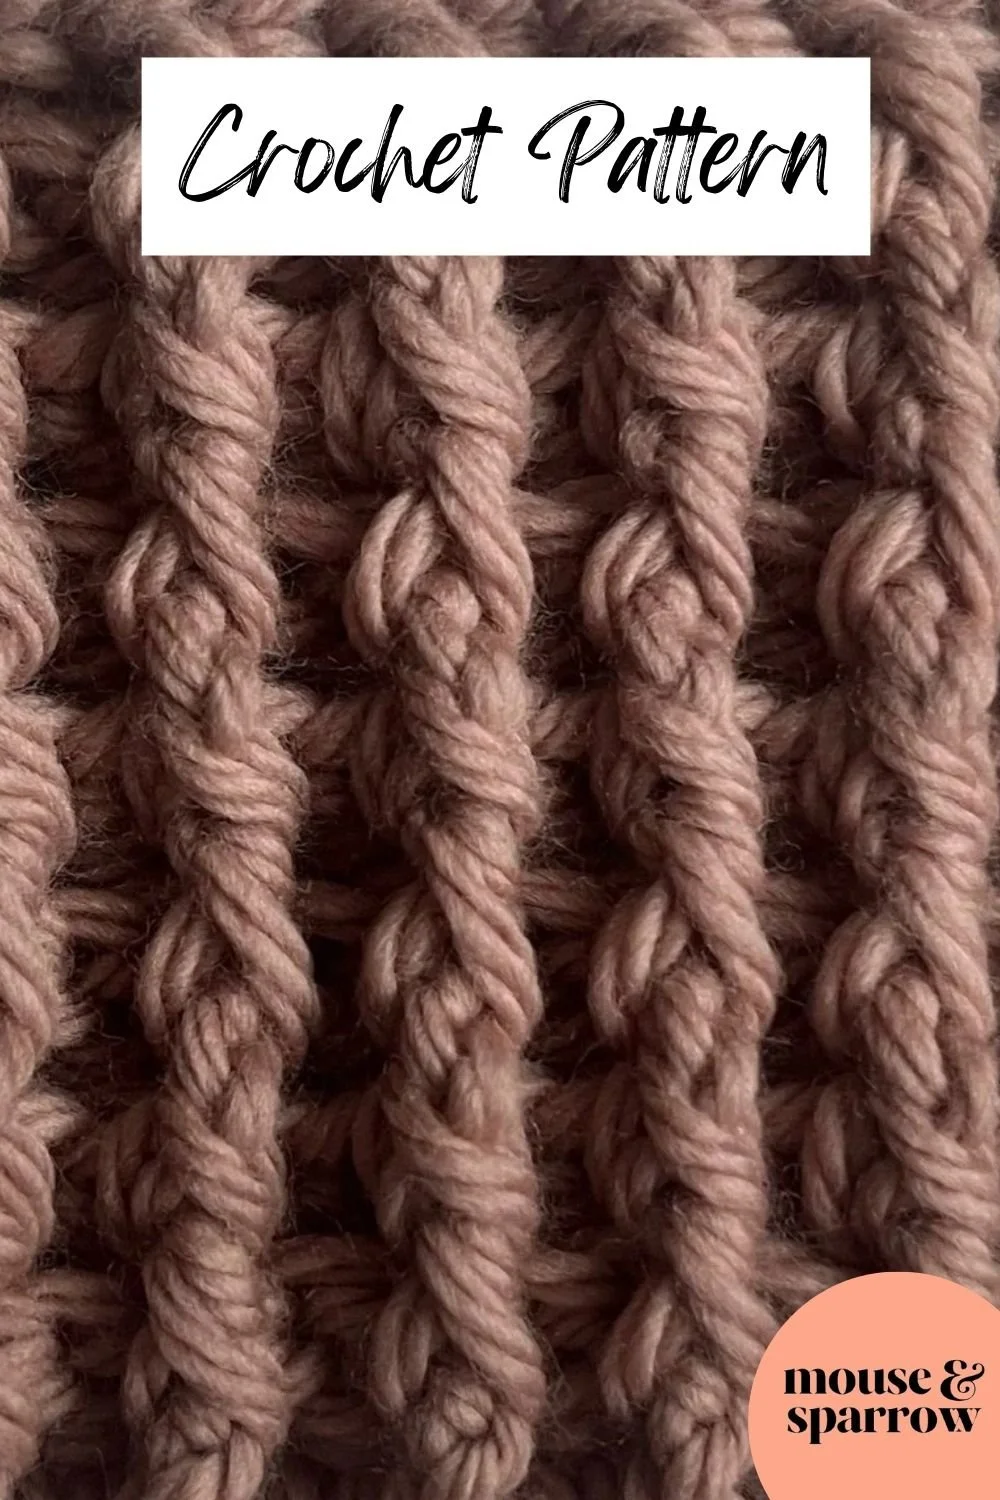
The Rib Stitch – Crochet Blanket Project Part 20
This post may contain affiliate links.
Welcome to Part 20 of our Crochet Blanket Project! This week, we’re diving into the Rib Stitch — a timeless, textured stitch that adds gorgeous dimension and cozy depth to your blanket.
With its rich texture, the rib stitch not only looks stunning but also feels amazing in your hands. It’s perfect for beginners because it’s easy to learn, yet still fun and engaging for more experienced crocheters looking to add a new twist to their projects.
📌 Pin this post to come back to it anytime.
Weekly Pattern Sampler: A Square at a Time! -
PART 20
✵ How It Works:
Each week, you'll receive a brand-new square pattern straight to your inbox (make sure you're on the mailing list so you never miss a pattern!).
Crochet two squares in complementary colours to practice the technique—and by the end of the week, you’ll have two finished pieces that show off your progress and growing confidence. 🌟
With every new square, your collection grows—adding texture, skill, and beauty to your future blanket. It’s a fun and relaxed way to improve your crochet skills, stay creatively inspired, and craft something truly one-of-a-kind, all at your own pace. ✨
✵ Are you new to crochet?
Start your crochet journey with A Beginner’s Guide to Crochet: Starting Your Journey to a More Relaxed You and discover the calming power of crafting! Followed by this this post - for a step-by-step guide to get started with the basic crochet stitches.
✵ Materials You’ll Need
Yarn Recommendations
Yarn: Worsted weight (#4) yarn is ideal—easy to work with and great for beginners.
Fiber: Go for organic cotton or wool for softness, durability, and crisp stitch definition.
Colours: Use two complementary shades per square for contrast and texture.
Inspiration combos:
🌿 Forest green & cream
❄️ Smoky grey & pale blue
🌼 Yellow & muted lavender
Using two colours really makes your stitches shine!
Yarns to Avoid
Skip slippery yarns like silk blends or super thin lace-weight cotton—they can be tricky to control and might cause frustration. Go for something soft, smooth, and easy to work with.

✵ More on the topic: Colour Therapy in Crochet: Choosing Yarns for Mood
🧶 Yarn & Hook Tips for This Pattern
Recommended Yarn
Try Lion Brand Basic Stitch Anti-Pilling Yarn in a light color. It’s beginner-friendly, doesn’t split easily, and the stitches show up clearly—perfect for practice. Plus, it holds up well wash after wash.
Best Hook to Use
Start with a G-6 (4mm) hook for worsted weight yarn. Metal or plastic hooks work great for beginners—they help the yarn glide smoothly.
If you're looking for a full set, the Yarniss Crochet Hook Set on Amazon is a great choice. It includes 14 sizes (2mm–10mm), has comfy rubber grips, and smooth aluminum tips to help keep your tension just right.
✵ More about crochet hooks: Understanding Crochet Hook Sizes and Types
Crochet Pattern
Skill Level – Easy
Pattern Notes
This pattern uses US crochet terms.
I used a chunky yarn with a 6 mm hook.
Crochet Stitch Abbreviation & Conversion Chart
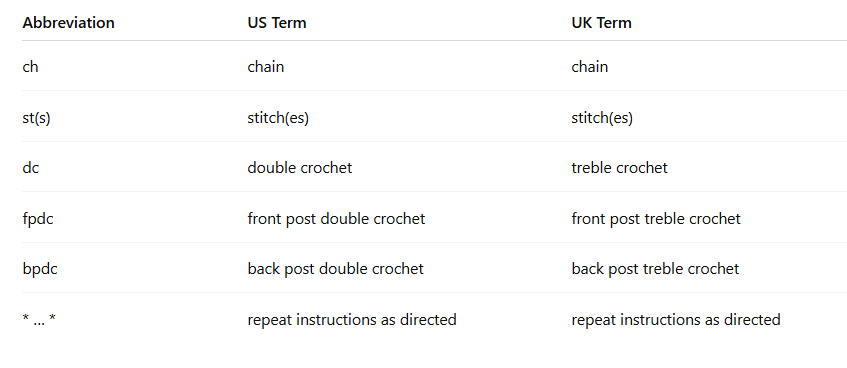
▶ Note: In the following instructions, I’ll spell out the abbreviations to make it easier for beginners who are just learning to read crochet patterns.
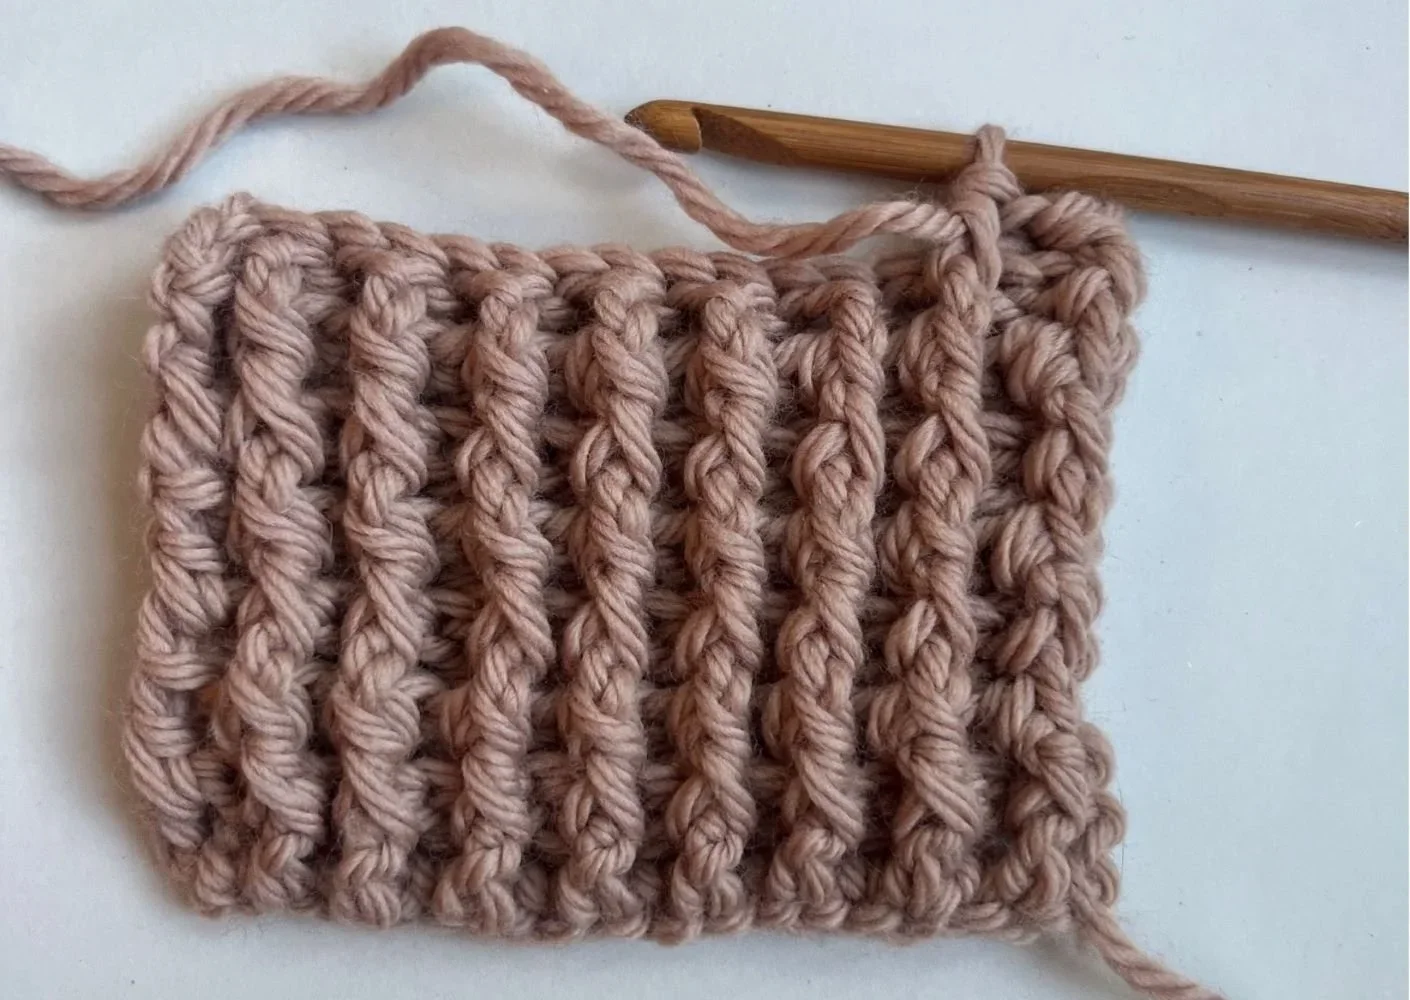
Rib Stitch pattern overview
To get started with the crochet rib stitch, you'll first need to chain an even number of stitches to create your foundation.
Next, you’ll work in rows, alternating between front post and back post double crochet (FPDC and BPDC).
The key to this stitch is to work the post stitches around the double crochets in the previous row, which creates the ribbed texture. As you continue, you’ll see the fabric begin to form its signature stretchy and textured pattern. Be sure to keep your tension consistent to achieve a smooth and even result throughout!
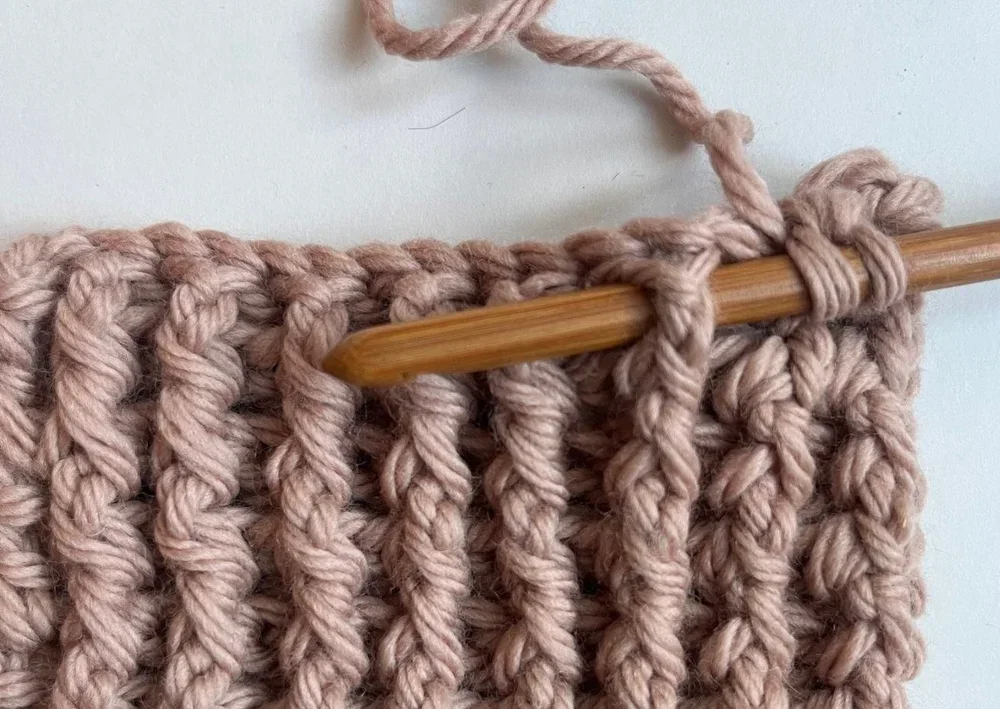
Front Post Double Crochet (FPdc): Yarn over, insert your hook from front to back to front around the front post of the stitch, yarn over and pull up a loop, yarn over pull through 2 loops, yarn over pull through 2 loops.
Back Post Double Crochet (BPdc): Yarn over, insert your hook from back to front to back around the back post of the stitch, yarn over and pull up a loop, yarn over pull through 2 loops, yarn over pull through 2 loops.
Pattern Instructions
Foundation Chain
Chain 30. If you’d like to make your square smaller or larger, simply chain any even number of stitches.
Row 1
Make a double crochet {UK: treble} in the 4th chain from your hook.
Then make a double crochet {UK: treble} in each chain across the row.
Turn your work.
Row 2
Chain 2 (this makes the first stitch).
Skip the first stitch.
Now we’ll start the ribbing:
Make 1 front post double crochet (FPdc {UK: FPtr}) around the next stitch.
Make 1 back post double crochet (BPdc {UK: BPtr}) around the following stitch.
Keep repeating 1 front post, 1 back post until you reach the end of the row.
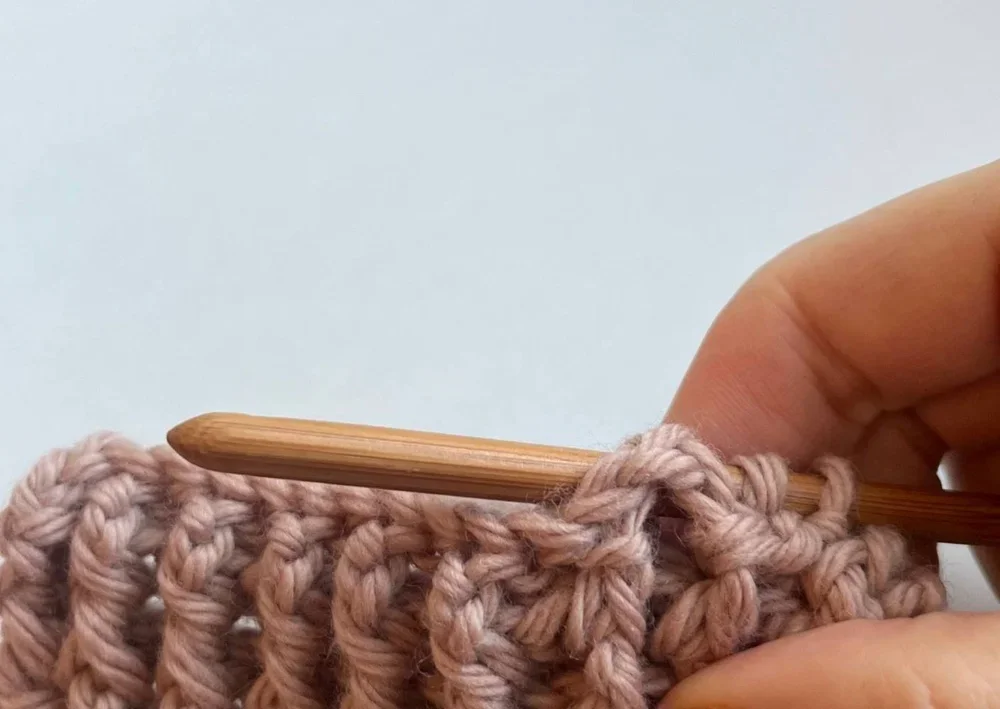
Make a double crochet {UK: treble} into the top of the turning chain.
Turn your work.
Row 3 and Beyond
Chain 2 (counts as the first stitch), skip the first stitch.
Then keep going across the row by working front posts into the front posts and back posts into the back posts from the row below.
End with a double crochet {UK: treble} into the top of the turning chain.
Turn your work and repeat for each new row.
To Finish:
Cut yarn, leaving a 6-inch (15 cm) tail.
Pull the tail through the last loop on your hook to secure.
Weave in all ends with a yarn needle.
Block your finished square to smooth out the edges.
Tips for Success with This Crochet Pattern
▶ Keep your edges straight → Always remember the last double crochet {UK: treble} in the top of the turning chain; this keeps your square from shrinking at the sides.
▶Stay consistent with posts → Front posts go into front posts, and back posts go into back posts; mixing them up will change the ribbing.
▶Check your tension → Post stitches can feel tighter than regular double crochets {UK: trebles}, so keep your yarn relaxed to avoid a stiff square.
✨ Celebrate Every Stitch & Be Proud Of Your Progress
You’ve just learned the rib stitch, a simple yet powerful way to add texture and style to your crochet projects. Every stitch you make is a step toward building your confidence and creativity — so don’t worry if it’s not perfect at first. Keep practicing, enjoy the process, and remember: every square you complete is a small victory in your crochet journey!
Happy crocheting! 🧶✨
What’s Next?
📌 Pin this post: Save this tutorial to your Pinterest boards so you can easily come back to it later.
💬 Leave a comment: We love hearing your feedback. Tell me in the comments below—how did this square go for you? This simple pattern works beautifully as a standalone design element or as part of a larger project.
🧶 Download the Blanket Square Planner: Ready to take your project to the next level? Click here to download the free planner and stay organized as you crochet your blanket squares.
✨ Get the Crochet Pattern Customization Kit: This download it full of tips, techniques and cheat sheets to help you make each project uniquely yours. Get it here.
More inspiring posts

Bring your Halloween decorating to life with this easy crochet bat pattern. Learn how to crochet bats with clear instructions, step-by-step photos, and beginner-friendly guidance. These small seasonal decorations are quick to make, fun to display, and perfect for adding a unique touch to your autumn home. Discover how a simple crochet project can become a Halloween favourite you'll bring out year after year.