
The Finishing Square | Crochet Blanket Project Part 32
This post may contain affiliate links.
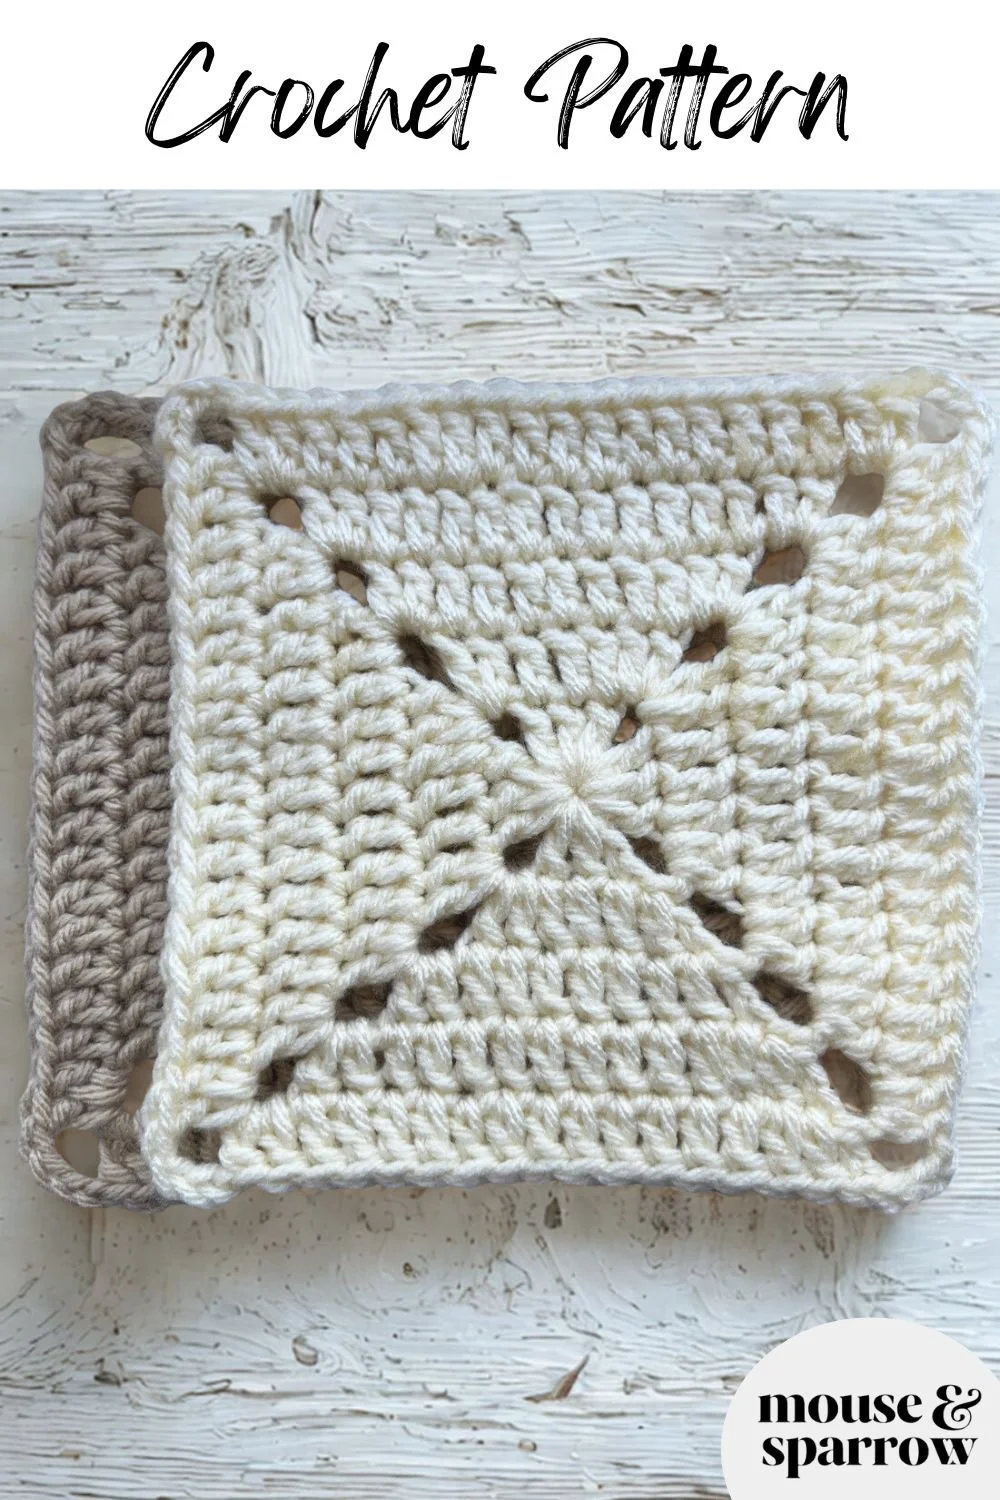
Welcome back to Part 32 of our Crochet Blanket Project — we’ve made it to the final square! ✨
This week, we’re creating a design with a simple, relaxing crochet pattern repeat. It’s a beautiful complement to the other squares and brings the whole blanket together perfectly.
Grab your yarn and hook — let’s enjoy making this final square together. 🧶✨
📌 Pin this post to come back to it anytime.
Weekly Pattern Sampler: A Square at a Time! -
PART 32
✵ How It Works:
Each week, you'll receive a brand-new square pattern straight to your inbox (make sure you're on the mailing list so you never miss a pattern!).
Crochet two squares in complementary colours to practice the technique—and by the end of the week, you’ll have two finished pieces that show off your progress and growing confidence. 🌟
With every new square, your collection grows—adding texture, skill, and beauty to your future blanket. It’s a fun and relaxed way to improve your crochet skills, stay creatively inspired, and craft something truly one-of-a-kind, all at your own pace. ✨
✵ Are you new to crochet?
Start your crochet journey with A Beginner’s Guide to Crochet: Starting Your Journey to a More Relaxed You and discover the calming power of crafting! Followed by this this post - for a step-by-step guide to get started with the basic crochet stitches.

✵ Materials You’ll Need
Yarn Recommendations
Yarn: Worsted weight (#4) yarn is ideal—easy to work with and great for beginners.
Fiber: Go for organic cotton or wool for softness, durability, and crisp stitch definition.
Colours: Use two complementary shades per square for contrast and texture.
Inspiration combos:
🌿 Forest green & cream
❄️ Smoky grey & pale blue
🌼 Yellow & muted lavender
Using two colours really makes your stitches shine!
Yarns to Avoid
Skip slippery yarns like silk blends or super thin lace-weight cotton—they can be tricky to control and might cause frustration. Go for something soft, smooth, and easy to work with.
✵ More on the topic: Colour Therapy in Crochet: Choosing Yarns for Mood
🧶 Yarn & Hook Tips for This Pattern
Recommended Yarn
Try Lion Brand Basic Stitch Anti-Pilling Yarn in a light color. It’s beginner-friendly, doesn’t split easily, and the stitches show up clearly—perfect for practice. Plus, it holds up well wash after wash.
Best Hook to Use
Start with a G-6 (4mm) hook for worsted weight yarn. Metal or plastic hooks work great for beginners—they help the yarn glide smoothly.
If you're looking for a full set, the Yarniss Crochet Hook Set on Amazon is a great choice. It includes 14 sizes (2mm–10mm), has comfy rubber grips, and smooth aluminum tips to help keep your tension just right.
✵ More about crochet hooks: Understanding Crochet Hook Sizes and Types
Crochet Pattern
Skill Level – Easy
Pattern Notes
This pattern uses US crochet terms.
I used a chunky yarn with a 6 mm hook.
Crochet Stitch Abbreviation & Conversion Chart

▶ Note: In the following instructions, I’ll spell out the abbreviations to make it easier for beginners who are just learning to read crochet patterns.
🪡 How This Square Is Worked
This square is worked in rounds, with the stitch count increasing evenly in each round to maintain its shape. The increases are grouped at the four corners, forming defined corner spaces that help the square lie flat and grow evenly.
New to crochet? Start here: How to Master Basic Crochet Stitches
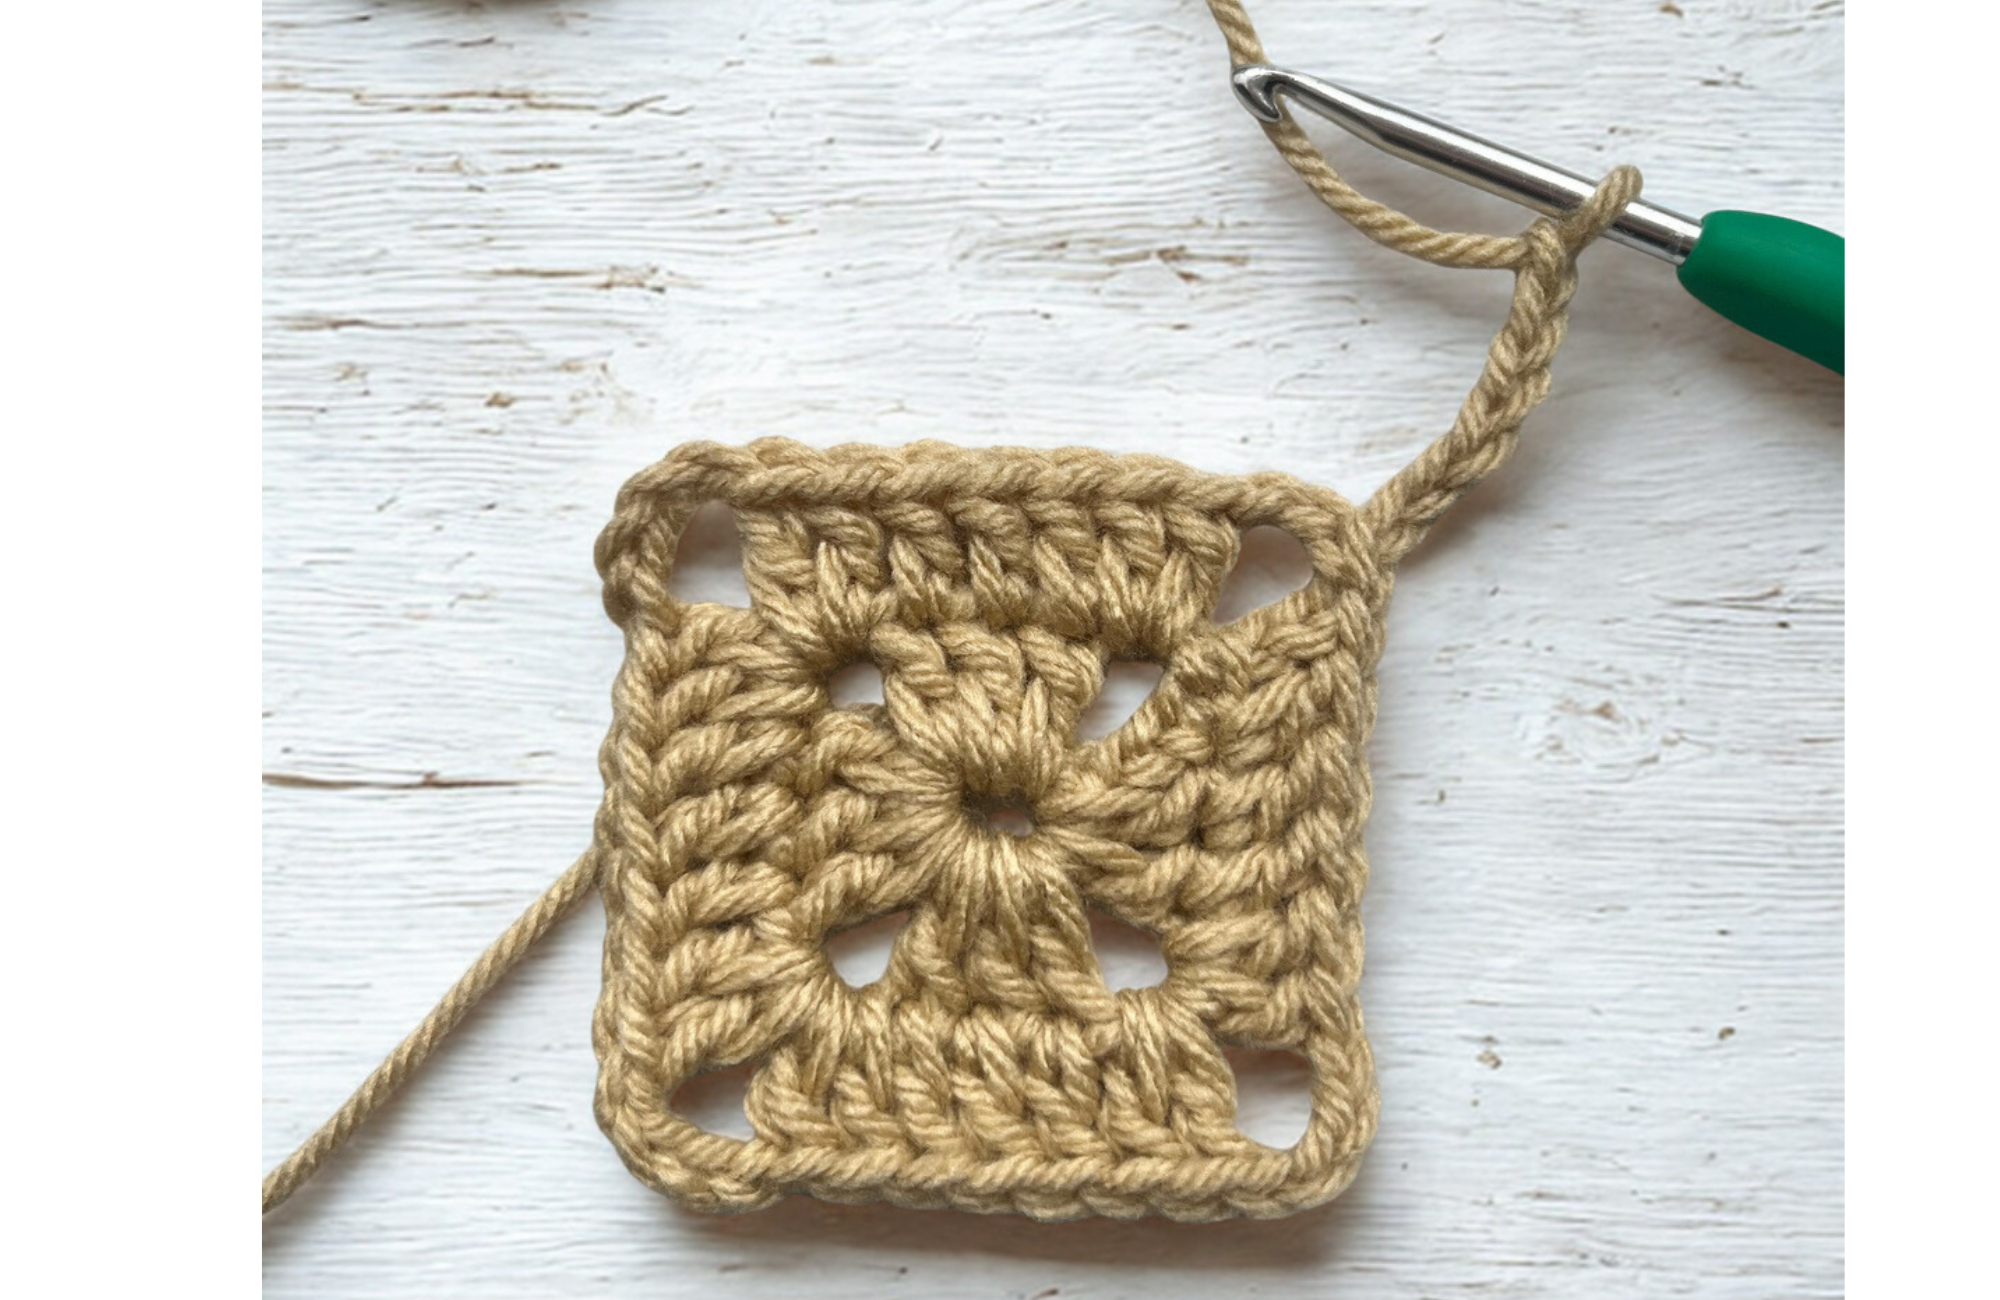
Start each new round with a slip stitch and six chain stitches.
Pattern Instructions
Foundation Circle
Chain 4.
Slip stitch into the first chain to form a ring.
Round 1:
Chain 5 (counts as 1 double crochet (UK: treble) and chain 2).
* Work 3 double crochet (UK: treble) into the ring, chain 2.*
Repeat from * to * 3 times.
Work 2 double crochet (UK: treble) into the ring.
Slip stitch into the 3rd chain of the beginning chain 5 to join.
Round 2:
Slip stitch into the next stitch (the 4th chain of the beginning chain 5)
Chain 6 (counts as 1 double crochet (UK: treble) and chain 4).
Work 2 double crochet (UK: treble) into chain space.
*Work 1 double crochet (UK: treble) in each of the next 3 stitches.
Work 2 double crochet (UK: treble), chain 4, and 2 double crochet (UK: treble) into the next chain space.*
Repeat from * to * twice.
Work 1 double crochet (UK: treble) in each of the next 2 stitches.
Work 1 double crochet (UK: treble) into the 3rd chain of the beginning chain 5 from the previous round.
Work 1 double crochet (UK: treble) into the next chain space.
Slip stitch into the 3rd chain of the beginning chain 6 to join.
Round 3:
Slip stitch into the next stich
Chain 6
Work 2 double crochet (UK: tr), into the chain space.
*Work 1 double crochet (UK: tr) in each of the next 4 stiches, then work 2 double crochet (UK: tr), chain 4, 2 double crochet (UK: tr) into the chain space *
Repeat from * to * twice
Work 1 double crochet (UK: tr) in each of the next 4 stiches, 1 double crochet (UK: tr) in 3rd chain of chain 6 at beginning of previous round.
Work 1 double crochet (UK: tr) into the next chain space
slip stitch into 3rd chain of chain 6 at beginning of this round.
Slip stitch into the next stitch
Chain 6 (counts as 1 double crochet (UK: treble) and chain 4).
Work 2 double crochet (UK: treble) into chain space.
*Work 1 double crochet (UK: treble) in each of the next 4 stitches.
Work 2 double crochet (UK: treble), chain 4, and 2 double crochet (UK: treble) into the next chain space.*
Repeat from * to * twice.
Work 1 double crochet (UK: treble) in each of the next 4 stitches.
Work 1 double crochet (UK: treble) into the 3rd chain of the beginning chain 6 from the previous round.
Work 1 double crochet (UK: treble) into the next chain space.
Slip stitch into the 3rd chain of the beginning chain 6 to join.
To Continue:
Repeat round 3 as required. 4 Stitches are added to each ground in each round.
Finish
Fasten off.
Cut yarn and pull through the loop to secure.
Weave in all ends securely on the wrong side.
Block your square if desired to shape and even out the stitches.
Tips for Success with This Crochet Pattern
▶ Count your stitches at the end of each round.
Make sure you have the correct number of stitches per side before joining. Catching a missed stitch early is much easier than undoing several rounds later.
▶ Work your corners into the chain space — not the stitches.
All corner groups (2 double crochet, chain 4, 2 double crochet) should be worked into the chain space. This keeps your square flat and evenly shaped.
▶ Keep your chain stitches relaxed.
If your chain-4 corners are too tight, your square may curl. Loosen your tension slightly on the chain stitches to help the square lie flat.
✨You Did It ✨
This was the final square in our blanket series — take a moment to appreciate how far you’ve come.
What started as one simple square has now become a full collection, ready to turn into something truly beautiful.
Next week, I’ll share the joining instructions so you can bring all your squares together into one finished blanket.
Until then, stack them up, admire your work, and give yourself credit — you’ve built this stitch by stitch.
I can’t wait to see it come together.
What’s Next?
📌 Pin this post: Save this tutorial to your Pinterest boards so you can easily come back to it later.
💬 Leave a comment: We love hearing your feedback. Tell me in the comments below—how did this square go for you? This simple pattern works beautifully as a standalone design element or as part of a larger project.
✨ Get the Crochet Pattern Customization Kit: This download it full of tips, techniques and cheat sheets to help you make each project uniquely yours. Get it here.
🧺 Try the Weekend Crochet Basket Mini Course: Looking for a quick, satisfying project to practice your stitches? The Basket Mini Course is perfect for creating a beautiful finished piece in just a weekend. Start it here.
More inspiring posts


Create a home filled with handmade details. Discover 8 crochet home décor ideas, from plant pot covers and hanging holders to practical baskets and beautiful accessories you’ll love to make and use every day.