
How To Crochet A Snowy Winter Tree - Free Pattern
A quick, festive project you can finish in an evening.
If you’re anything like me, this time of year sneaks up fast. One minute it’s pumpkins and hot chocolate, and the next — it’s suddenly Christmas concerts, teacher gifts, and a half-decorated tree.
So when I need something handmade that’s quick and beautiful, I reach for this little Snowy Winter Tree. It’s small, festive, and satisfying to make — the kind of project you can finish while watching a Christmas movie (or waiting for the mince pies to bake).
It works up in under an hour using just simple stitches — no tricky shaping, no fancy techniques — and makes the sweetest last-minute gift or tree ornament.
You can make one to hang on your Christmas tree, tie it to a wrapped present, or pop a few in a bowl for that minimalist, handmade décor look I secretly adore.
Ready to make one together? Grab your hook — and let’s crochet!
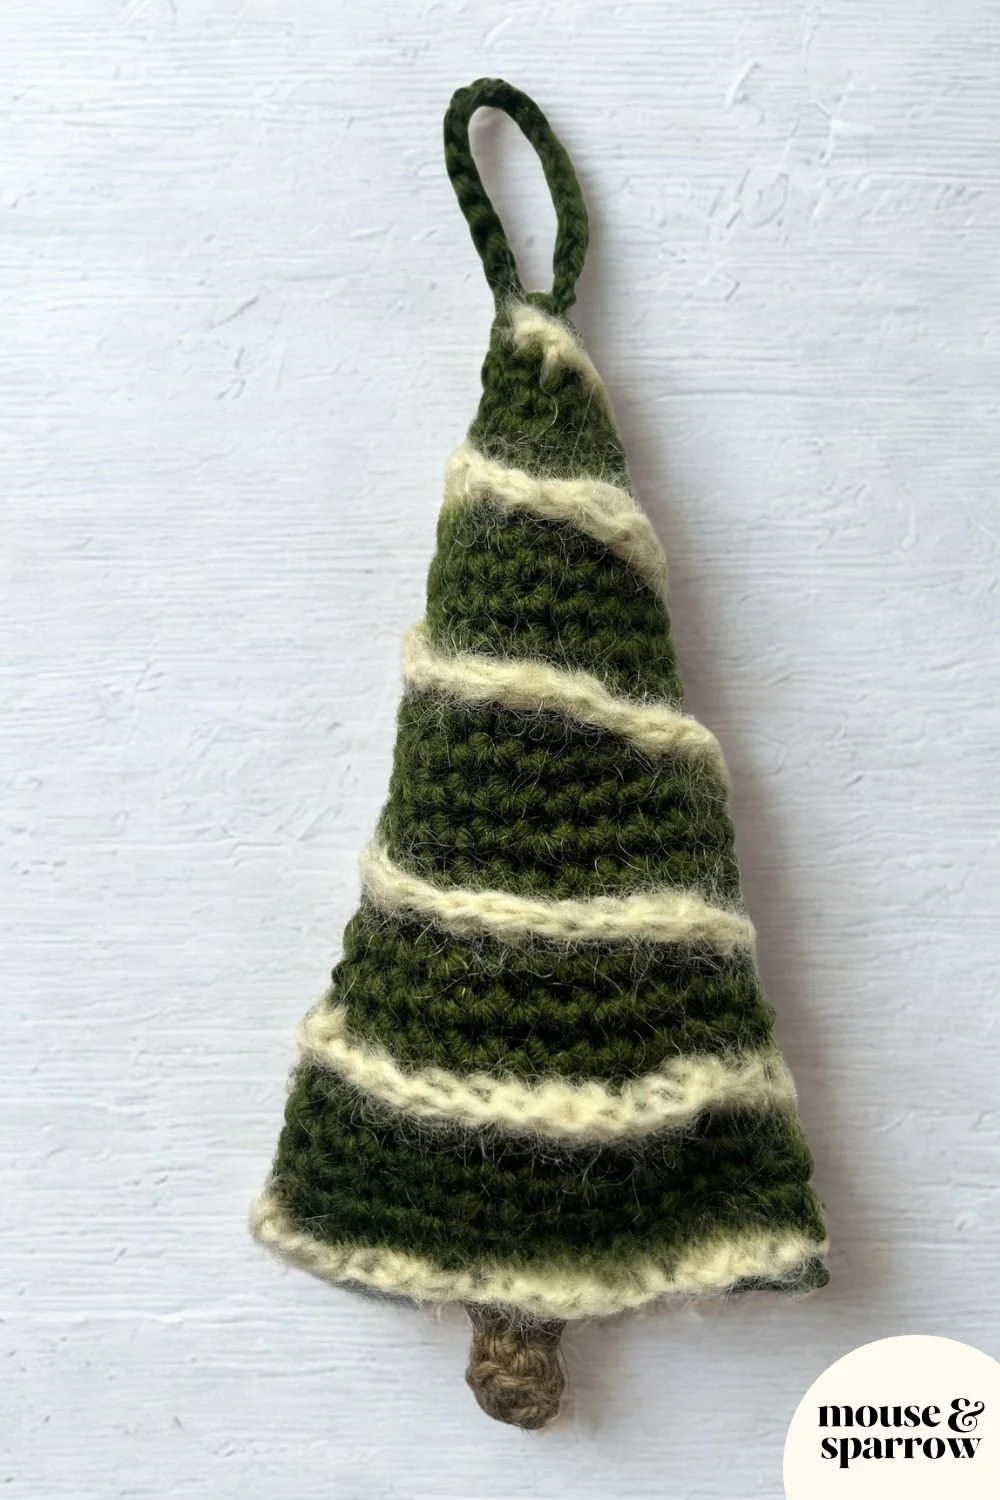
Free crochet snowy tree pattern
This free crochet tree pattern is perfect for beginners!
This little tree is made entirely with single crochet stitches (double crochet in UK terms) — one of the simplest and most versatile stitches to learn. There’s no tricky shaping, no complex stitch patterns, and no need to keep track of long stitch repeats. Once you’ve mastered the single crochet, the rest flows easily — making it a wonderfully relaxing project to build confidence, practice even tension, and see quick, satisfying progress
📍New to crochet? This should help to get you started: A Beginner's Guide to Crochet
🧶 Materials & Tools
You’ll only need a few things for this project — you might even have them already:
Yarn: A small amount of cotton or DK yarn. I used a green for the tree and a little cream for the “snow” edge.
→ Lion Brand 24/7 Cotton.Crochet Hook: The size recommended on your yarn label (I used a 3 mm hook).
→ The Yarniss Crochet Hook Set includes ergonomic, soft-grip handles and smooth hooks — perfect for beginners who want comfort, speed, and tangle-free stitching on every project.Tapestry Needle for weaving in ends
→ The KYUEWRT 10-Piece Yarn Darning Needle Set comes with large-eye, bent-tip needles in a storage tube — ideal for weaving in ends, sewing pieces together, and keeping your crochet finishing tools neatly organised.Ribbon or Twine for the hanging loop
→ Natural Jute Twine or Red Ribbon Pack.Optional: A little stuffing if you want the tree to be slightly padded
→ Cotton Stuffing.


🌲 Free Crochet Pattern – Snowy Winter Tree
PATTERN NOTES
🧶 Skill Level: Easy — perfect for confident beginners.
🧶Time: 1-2 hours
🔁 Construction: Worked in continuous rounds (do not join at the end of each round unless stated).
🇺🇸 Terminology: Written in US terms with UK equivalents in brackets.
📏 Finished Size: Approximately 12 cm tall.
Your final measurements may vary depending on your yarn choice, hook size, and individual stitch tension.
Overview of stiches used and crochet stitch conversion chart:

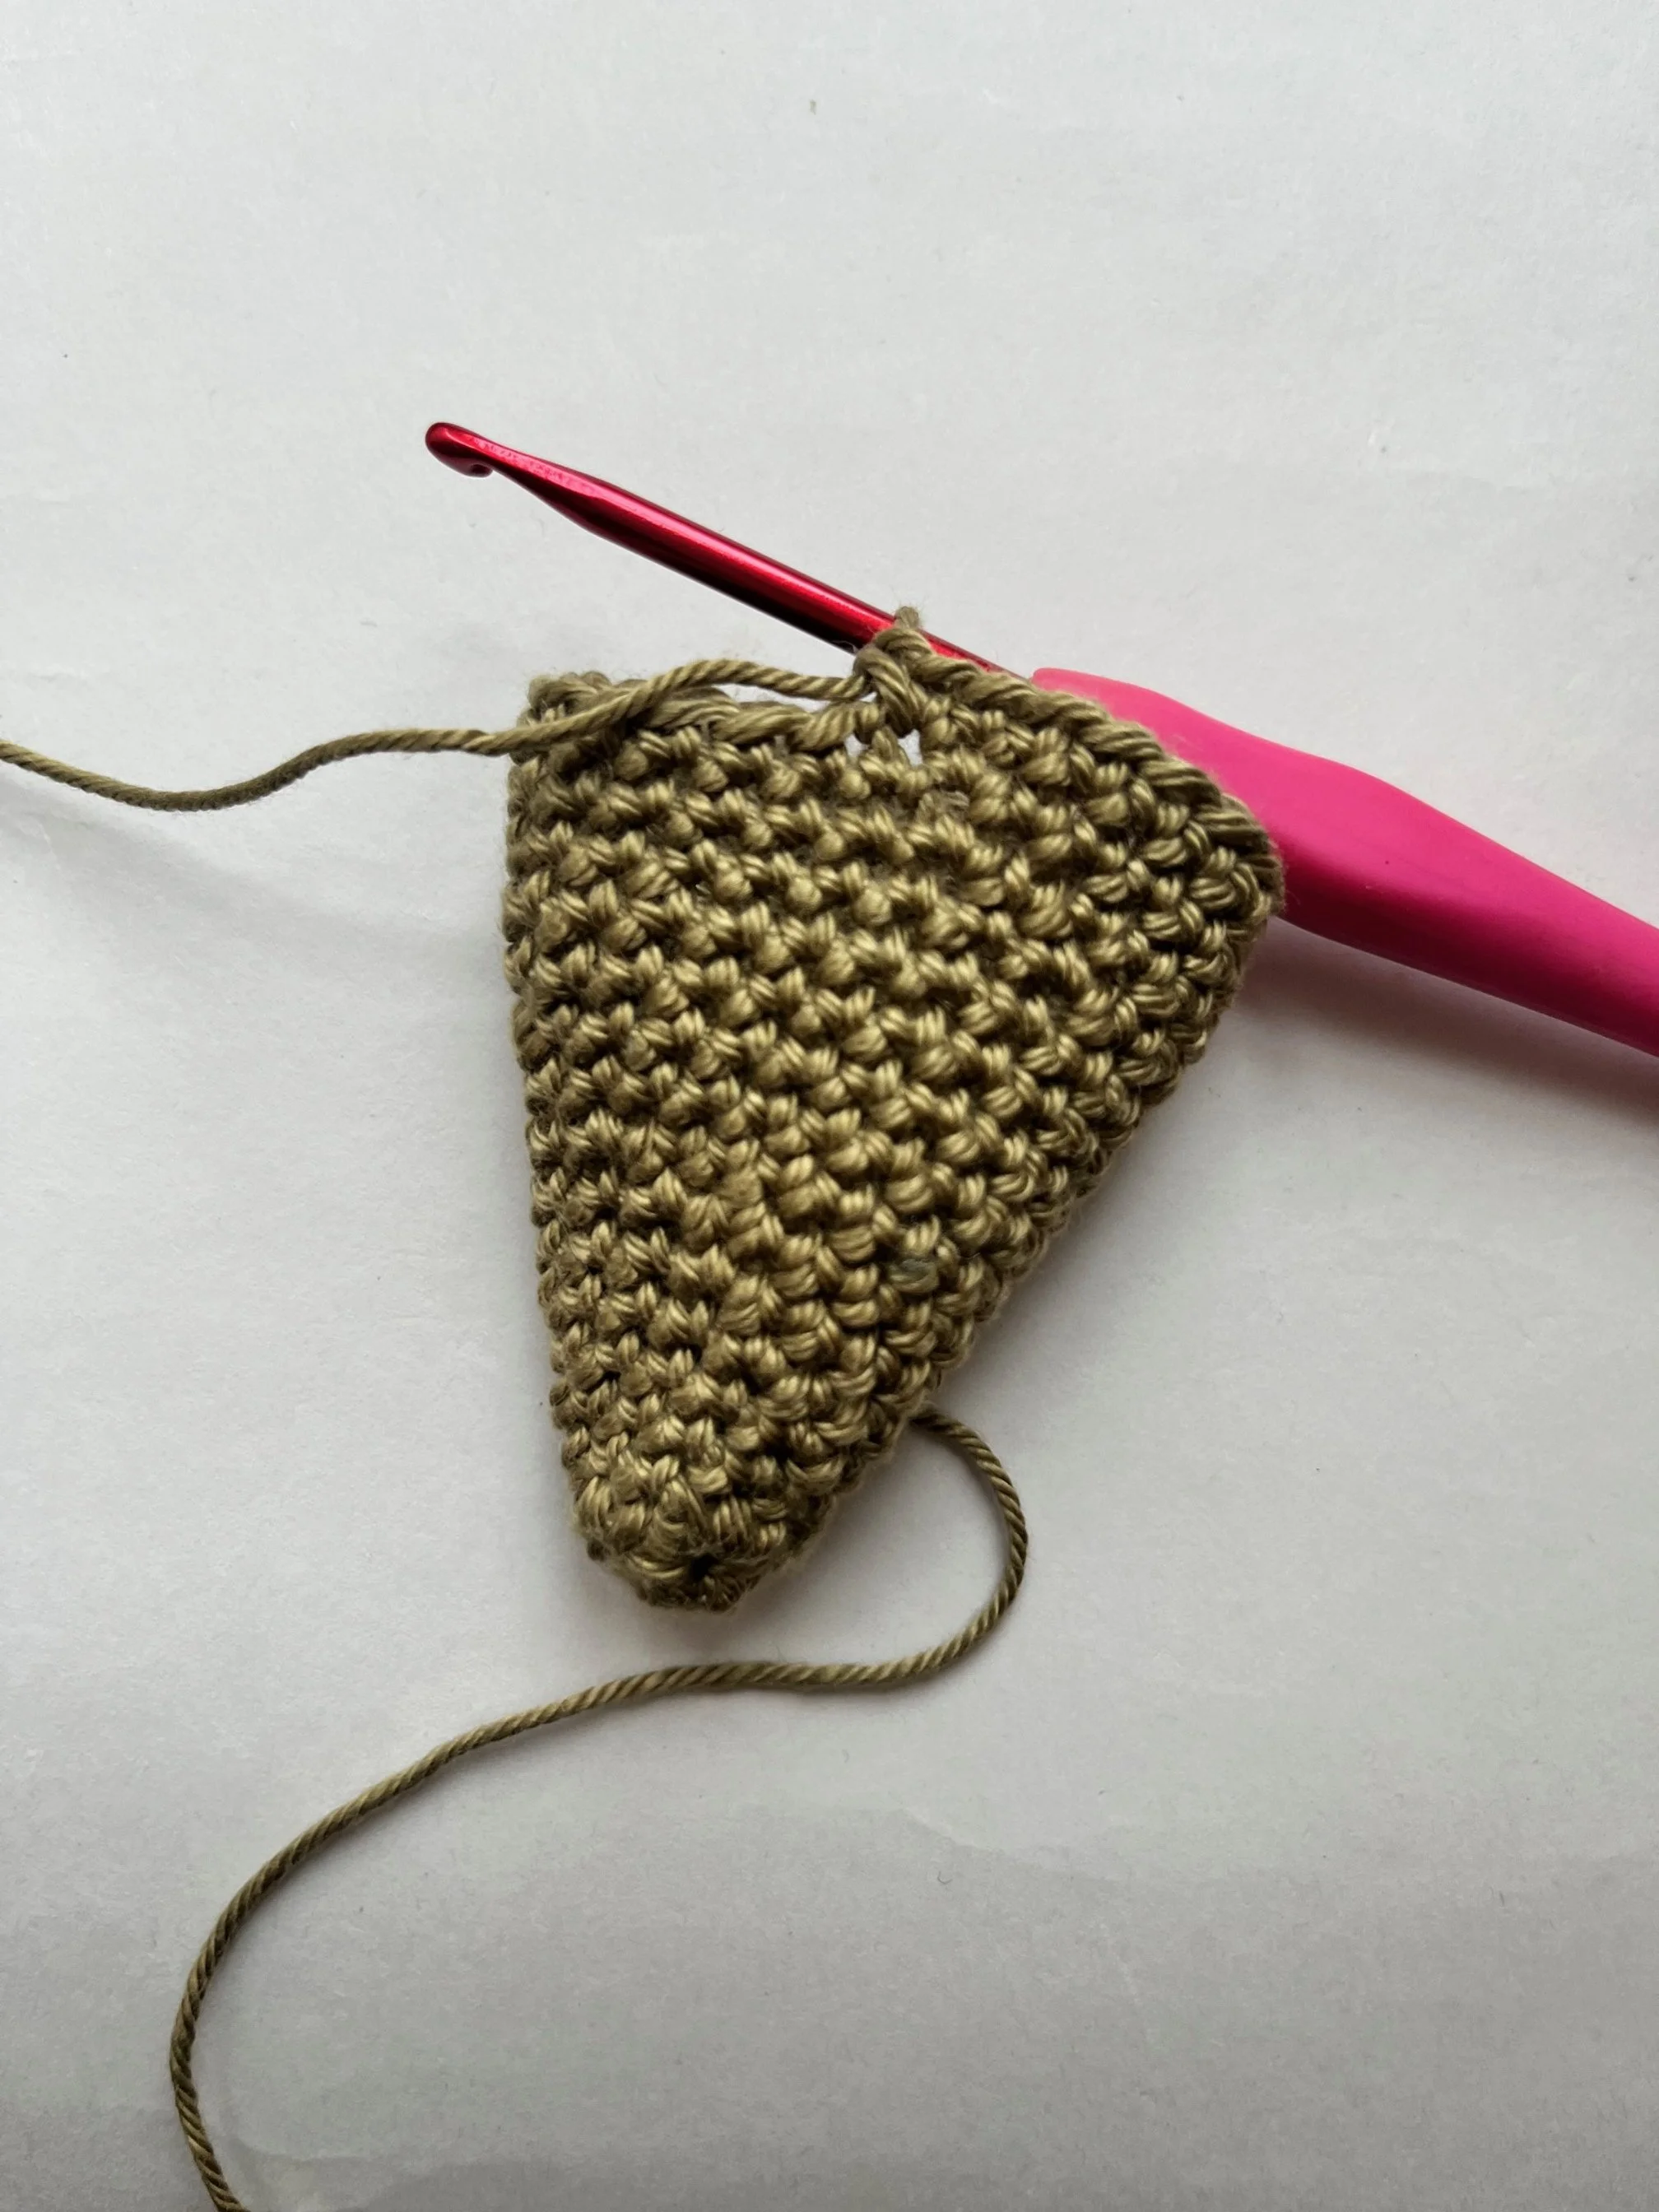
TREE BODY:
START
With green yarn, chain 3. Slip stitch [UK: slip stitch] into the first chain to form a small circle.
Work 4 single crochet [UK: double crochet] stitches into the centre of the circle. (4 sts)
📍Continue working in continuous rounds, with the outside of the tree facing you as you crochet. Use a stitch marker to mark the beginning of each round.
Round 1: 1 sc [UK: dc] in each stitch around. (4 sts)
Round 2: 1 sc [UK: dc] in next st, 2 sc [UK: dc] in next st — repeat 2 times. (6 sts)
Round 3: 2 sc [UK: dc], 2 sc [UK: dc] in next st — repeat 2 times. (8 sts)
Round 4: 3 sc [UK: dc], 2 sc [UK: dc] in next st — repeat 2 times. (10 sts)
Round 5: 4 sc [UK: dc], 2 sc [UK: dc] in next st — repeat 2 times. (12 sts)
Round 6: 5 sc [UK: dc], 2 sc [UK: dc] in next st — repeat 2 times. (14 sts)
Round 7: 6 sc [UK: dc], 2 sc [UK: dc] in next st — repeat 2 times. (16 sts)
Round 8: 7 sc [UK: dc], 2 sc [UK: dc] in next st — repeat 2 times. (18 sts)
Round 9: 8 sc [UK: dc], 2 sc [UK: dc] in next st — repeat 2 times. (20 sts)
Round 10: 9 sc [UK: dc], 2 sc [UK: dc] in next st — repeat 2 times. (22 sts)
📍Now we start alternating: one round with increases, one round plain.
Round 11: 1 sc [UK: dc] in each st around. (22 sts)
Round 12: 10 sc [UK: dc], 2 sc [UK: dc] in next st — repeat 2 times. (24 sts)
Round 13: 1 sc [UK: dc] in each st around. (24 sts)
Round 14: 11 sc [UK: dc], 2 sc [UK: dc] in next st — repeat 2 times. (26 sts)
Round 15: 1 sc [UK: dc] in each st around. (26 sts)
Round 16: 12 sc [UK: dc], 2 sc [UK: dc] in next st — repeat 2 times. (28 sts)
Round 17: 1 sc [UK: dc] in each st around. (28 sts)
Round 18: 13 sc [UK: dc], 2 sc [UK: dc] in next st — repeat 2 times. (30 sts)
Round 19: 1 sc [UK: dc] in each st around. (30 sts)
Round 20: 14 sc [UK: dc], 2 sc [UK: dc] in next st — repeat 2 times. (32 sts)
Round 21: 1 sc [UK: dc] in each st around. (32 sts)
Round 22: 15 sc [UK: dc], 2 sc [UK: dc] in next st — repeat 2 times. (34 sts)
Round 23: 1 sc [UK: dc] in each st around. (34 sts)
Round 24: 16 sc [UK: dc], 2 sc [UK: dc] in next st — repeat 2 times. (36 sts)
Round 25: 1 sc [UK: dc] in each st around. (36 sts)
CLOSE THE TREE
Lightly stuff the tree with fibre fill before closing.
Flatten the open edge so the stitches line up evenly.
Working through both layers:
Sc [UK: dc] across the first 7 stitches to close one side.
Fasten off and skip the next 3 stitches — this will leave a small opening for the trunk.
Rejoin your yarn on the opposite side of the gap and sc [UK: dc] across the remaining 8 stitches to close the other side.
Cut yarn and weave in the ends securely.
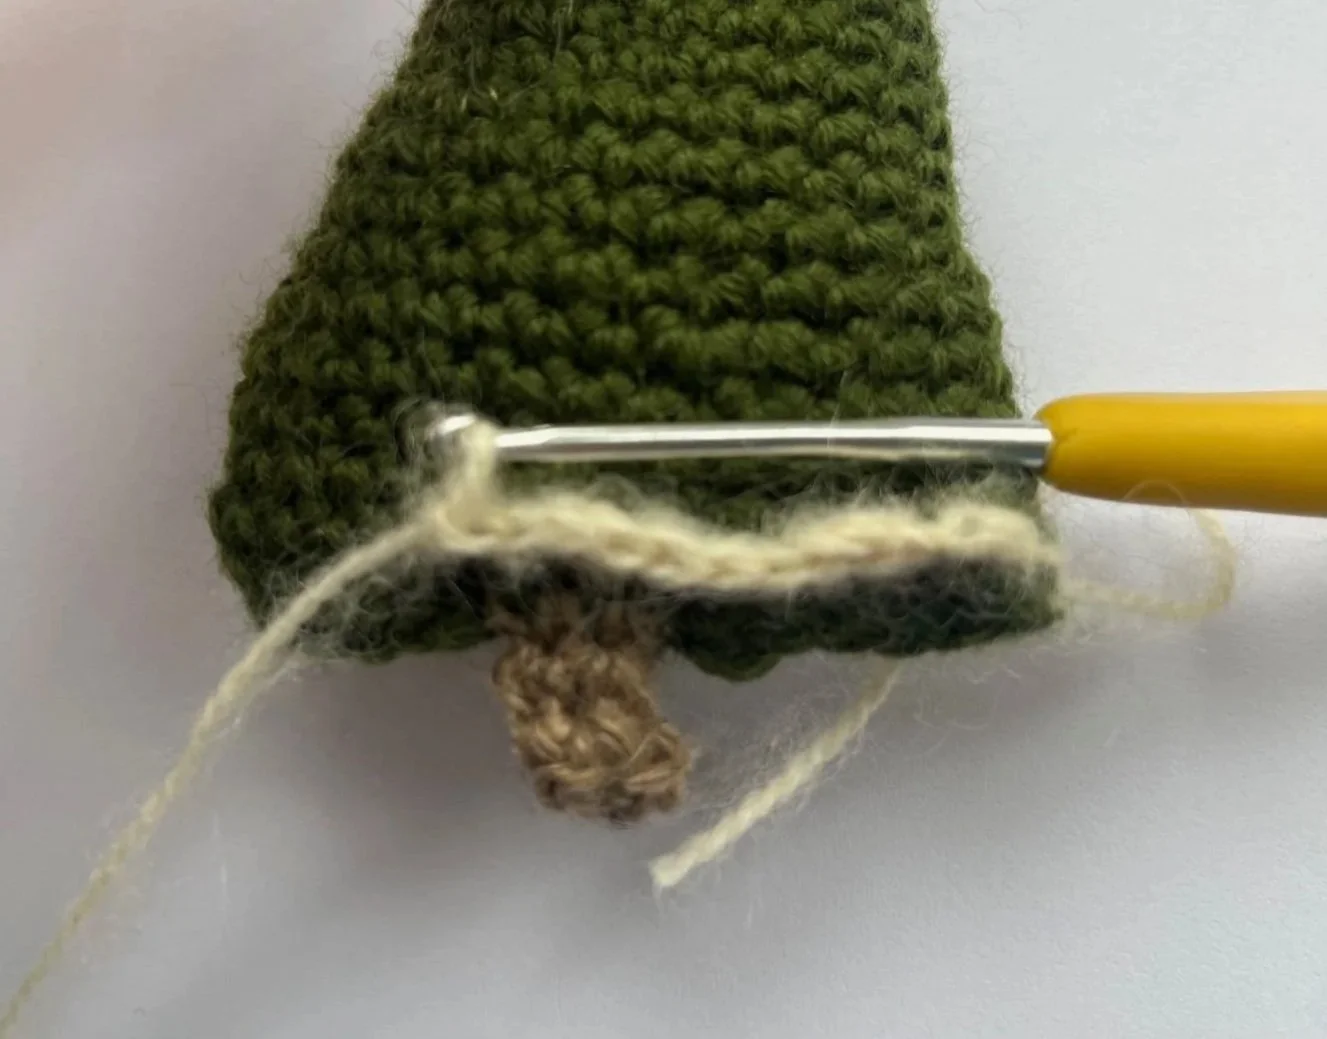
🪵 TRUNK
With brown yarn, rejoin at the bottom opening of the tree.
Work into the central 6 stitches (3 from each side of the opening) to form the base of the trunk.
Round 1: 1 single crochet [UK: double crochet] in each stitch around. (6 sts)
Rounds 2–6: 1 single crochet [UK: double crochet] in each stitch around. (6 sts per round)
Stuff the trunk lightly as you go to help it hold its shape.
Fasten off and weave in the ends neatly.
SNOW TOPPING
With cream yarn, add the snow detail by working surface stitches directly onto the outside of the tree.
This creates a soft spiral of snow wrapping gently around your tree.
START
Slip stitch into place at the bottom corner of the tree.
Continue as follows moving in a spiral around the surface of the tree:
2 single crochet [UK: double crochet]
1 half double crochet [UK: half treble crochet]
1 double crochet [UK: treble crochet]
1 half double crochet [UK: half treble crochet]
Repeat this sequence until you reach the top of the tree, adjusting the curve of your stitches slightly as needed to keep the spiral even.
Fasten off and weave in the ends carefully on the back of your work.
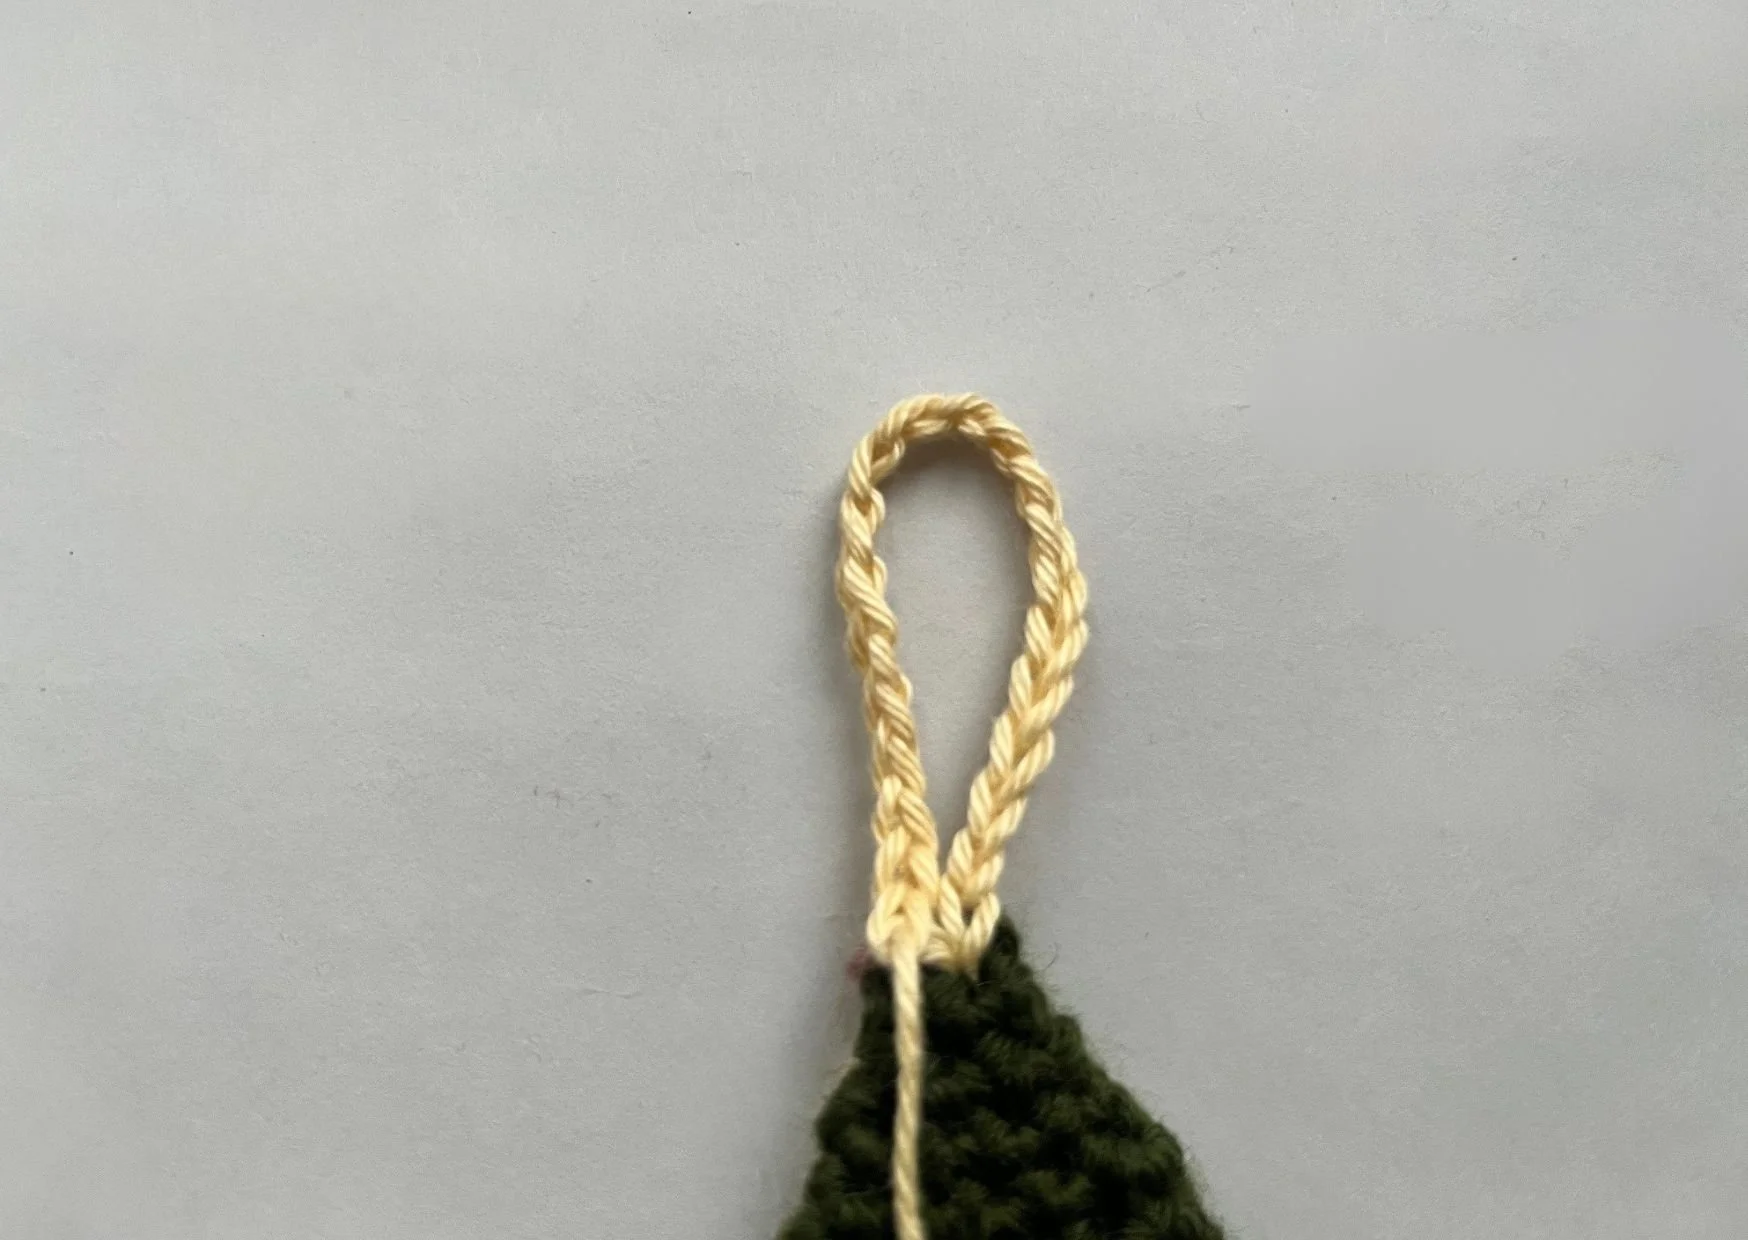
HANGING LOOP
With cream yarn (or your preferred colour), create a simple hanging loop for your ornament.
Slip stitch [UK: slip stitch] into the top of the tree.
Chain 20, then slip stitch [UK: slip stitch] back into the same stitch at the base of the chain to form a loop.
Fasten off, secure the end firmly, and weave in any remaining tails neatly on the back.
Your Snowy Winter Tree Ornament is now ready to hang and enjoy! ✨

✨ Want to Take It a Step Further?
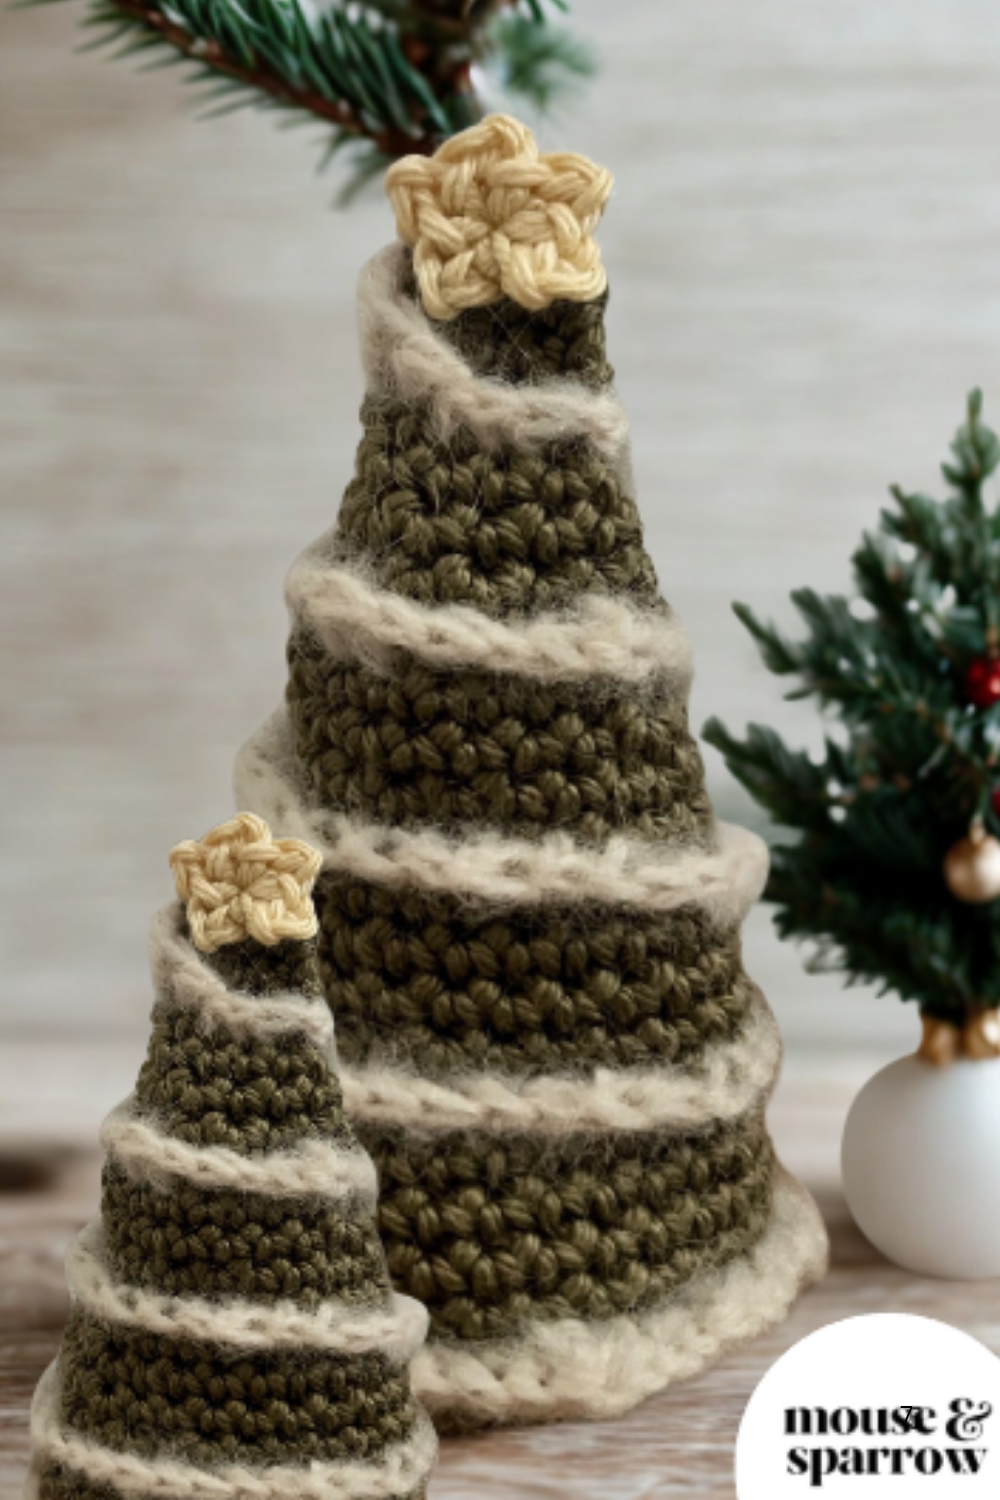
If you’d like your tree to stand on its own (perfect for mantel displays or table décor), or if you’d love to add the little star topper you might’ve seen in my photos — both are included in the premium PDF version of this pattern.
The PDF also includes:
⭐ Printable, ad-free layout
⭐ Extra finishing details (star + standing base)
You can grab it here → Get the Full Snowy Winter Tree Pattern
Ideas for Gifting Your Crochet Tree
I love how versatile this little project is — it’s one of those makes that always gets a “You made this?!” reaction.
Here are some of my favourite ways to gift it:
Teacher Gift: Attach it to a box of chocolates or a mini candle.
Neighbour Gift: Tie it to a bottle of mulled wine.
Gift Tag Upgrade: Use it instead of a paper tag — it’s the little extra that makes your wrapping feel special.
Mini Tree Forest: Crochet a few in neutral tones and display them on a wooden tray for instant festive décor.
(Optional affiliate placement here: small wooden display tray or mini gift boxes)
A Few Quick Tips
Don’t stress about perfection — trees aren’t meant to be symmetrical!
If you’re new to working in the round, use a stitch marker (or a scrap of yarn) to mark where each round begins.
→ Here are some cute cat stitch markers in case you need some.These trees look adorable in all sorts of yarns — try a fluffy one for a “snow-covered” look or rustic twine for a natural vibe.
Batch-make them! Once you’ve done the first one, the next few fly off your hook.
Your Turn To Crochet A Tree!
If you’ve been craving something simple and festive that you can actually finish in one sitting — this little Snowy Tree is the perfect make.
It’s proof that crochet doesn’t have to be complicated to be beautiful. You can grab a bit of yarn, make something from your heart, and gift it proudly.
What Next?
Start Your Next Crochet Moment Today
📌 Pin this post:
Love quick crochet projects as much as I do? Save this post to your Pinterest boards so you’ll always have a weekend project ready when the inspiration hits.
💬 Let’s chat in the comments:
Do you already have a granny square on your hook — or is this your sign to start one today? I’d love to hear what you’re working on, your favorite color combinations, or how you plan to gift your next make.
✨ Download the Snowy Winter Tree Crochet Pattern — If you’d like your tree to stand on its own, or if you’d love to add the little star topper you might’ve seen in my photos — both are included in the PDF version of this pattern.
✨ Download your free Classic Granny Square Pattern — it’s the perfect way to get started right now. Simple, beautiful, and beginner-friendly, it’s a little creative win you can finish in one cozy evening.
🧶 Turn it into something you’ll love to use — try the Daisy Crochet Book Cover Pattern or explore the Weekend Crochet Kits for ready-to-go projects that make handmade gifting easy.
🎨 Want to take it further?
Grab the Crochet Pattern Customisation Kit — packed with design cheatsheets, color planning tools, and creative tips to help you turn any granny square into a piece that’s truly yours.
More inspiring posts


Bring your Halloween decorating to life with this easy crochet bat pattern. Learn how to crochet bats with clear instructions, step-by-step photos, and beginner-friendly guidance. These small seasonal decorations are quick to make, fun to display, and perfect for adding a unique touch to your autumn home. Discover how a simple crochet project can become a Halloween favourite you'll bring out year after year.